| “This site contains affiliate links for which OEMDTC may be compensated” |
April 12, 2018 NHTSA CAMPAIGN NUMBER: 18V234000
Entry Door May Open While Moving
If the entry door opens unexpectedly, it can increase the risk of injury.
NHTSA Campaign Number: 18V234
Manufacturer Forest River , Inc.
Components STRUCTURE, LATCHES/LOCKS/LINKAGES
Potential Number of Units Affected 597
Summary
Forest River , Inc. (Forest River
 ) is recalling certain 2018-2019 Forest River
 FR3 and Georgetown recreational vehicles. The entry door latch may not engage fully, allowing the door to open unexpectedly while moving.
Remedy
Forest River will notify owners and dealers will install shims between the entry door frame and the wall frame, two additional screws will be added through the entry door frame to secure the door frame to the sidewall frame and will verify that the entry door latch pawl is properly contacting the striker bolt, if required the dealer will adjust the striker bolt, at no charge to the owner. The recall began on May 9, 2018. Owners may contact Forest River
 customer service at 1-574-206-7600. Forest River
 ’s number for this recall is 68-0700.
Notes
Owners may also contact the National Highway Traffic Safety Administration Vehicle Safety Hotline at 1-888-327-4236 (TTY 1-800-424-9153), or go to www.safercar.gov.
Forest River , Inc.
Dexter Door Recall Remedy Procedure
Recall 18V234
Kit Includes:
|
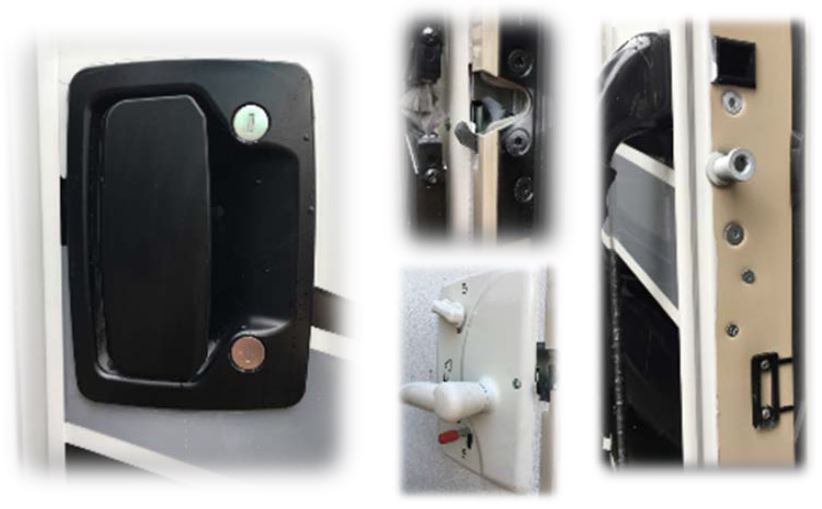
Step 1: Identify the problem
Make sure this applies to your motorhome. This recall only applies to the Dexter Door.
Door.
- These are the components of the Dexter
 Door.
Door.
If your door does not have these components, then your unit is not part of this recall.
Step 2: Remove the interior trim at the latch
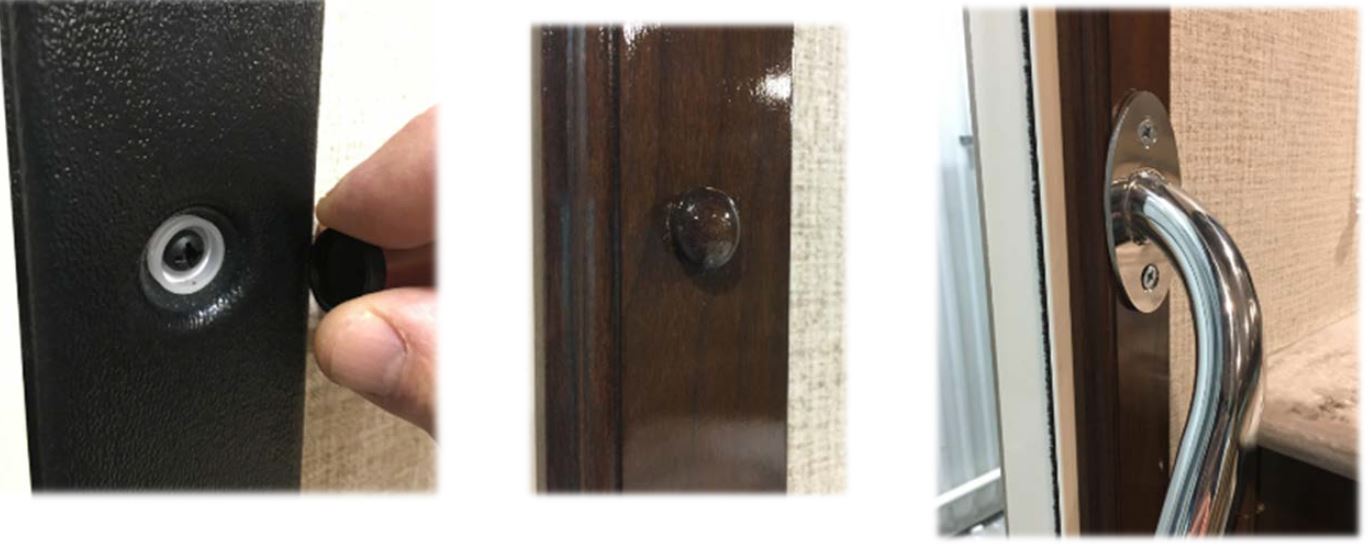
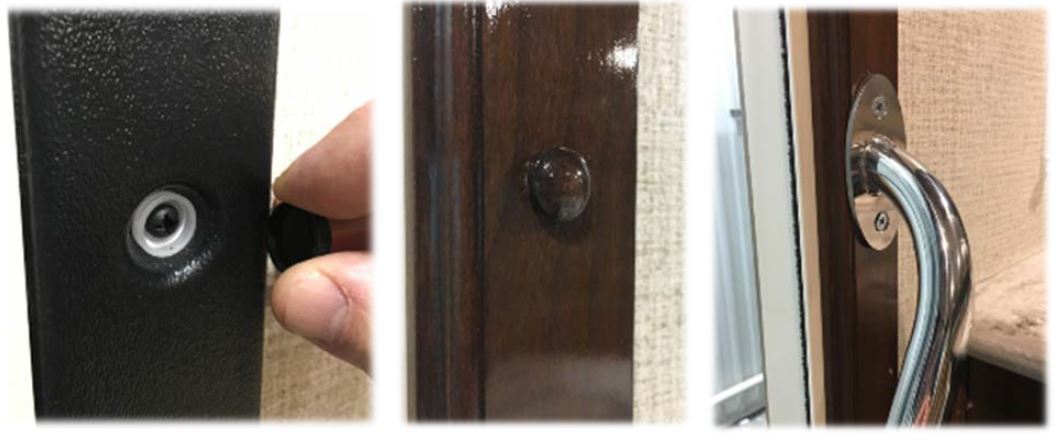
If your unit has plastic trim, pop the screw covers and remove the screws.
If your unit has wood trim, you will also have screw covers to remove but they are wood. Pop those off and remove the screws. Be careful not to scratch your trim.
You may need to remove the screws from the door rail at the top.
Step 3:
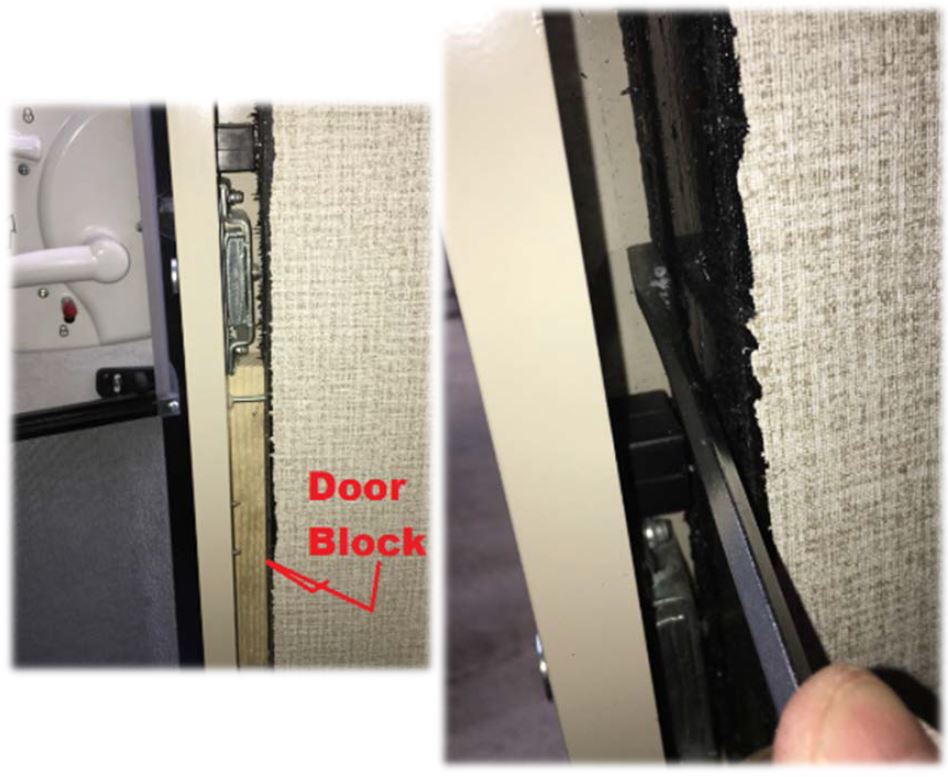
Clear the space between the door frame and the sidewall frame. There needs to be a flat surface on the sidewall frame for the shims to rest against. Leave the original door block in place, particularly if it is against the sidewall frame.
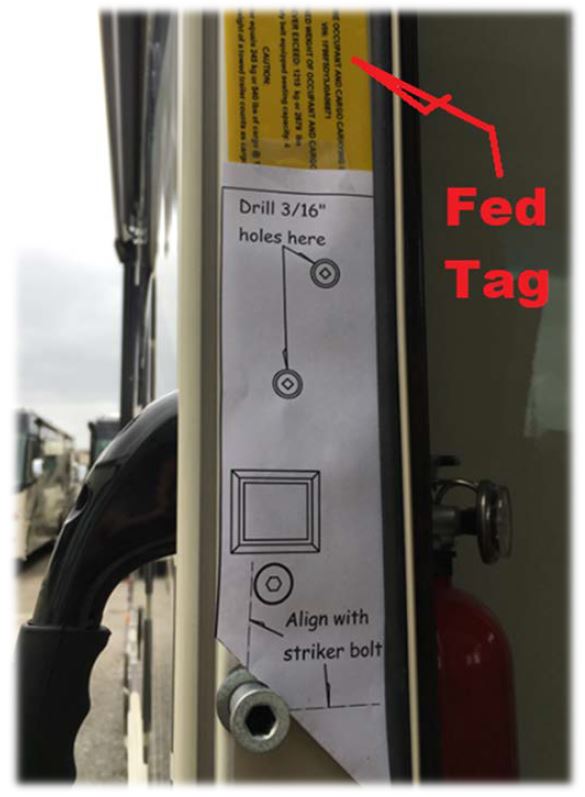
Step 4: Apply the template to the door frame and drill the holes.
Drill the holes indicated on the template. Drill only through the aluminum door frame. (The template is on the last page of this document if printed on 8 ½ x 11 sized paper) Use a 3/16” bit. (Not the size of the circles!!)
If the Fed Tag (Yellow Sticker) is low enough that the holes would go through the Fed Tag, the holes can be moved down slightly to accommodate it.
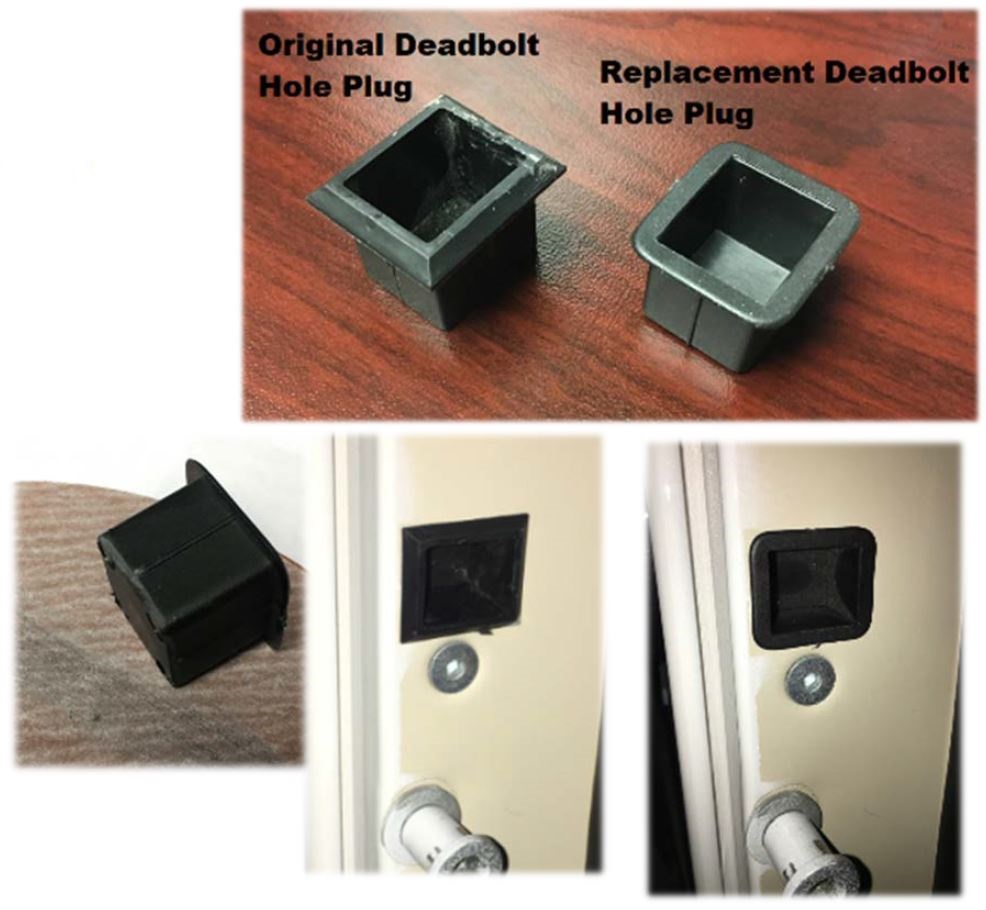
Step 5 Replace the deadbolt hole plug
- Some plugs have a screw inside them. Remove the screw if it’s there.
- Remove the plug and discard
- Replace with the supplied plug. (Be careful on installation, they are more delicate than the one being replaced. It has a narrower lip. It may be necessary to taper the back side of the plug to get it started in the opening. A piece of sandpaper helps this process
Step 6: Fit the shims
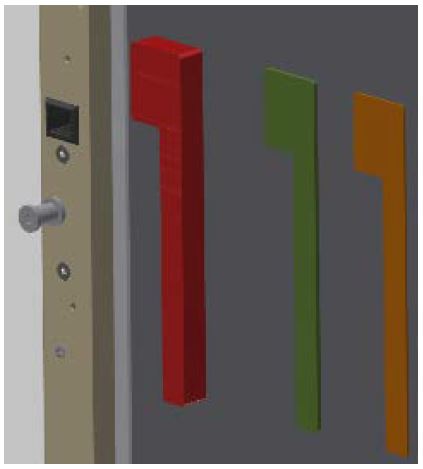
The purpose of the shims(fig 1)is to fill the gap between the door frame and the sidewall frame. They provide a solid support for the door frame.
Make sure you stack enough shims to fill the gap but not so many that it deforms the frame.
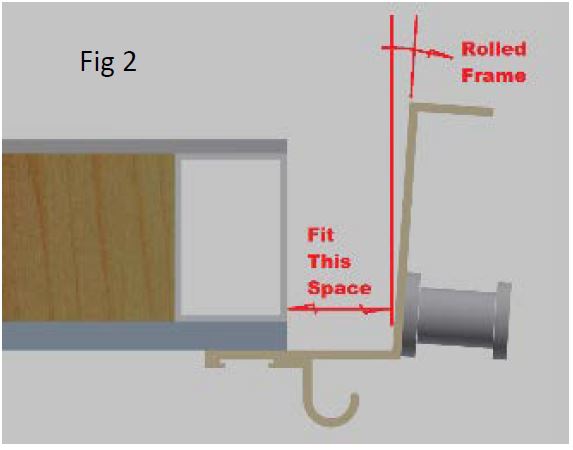
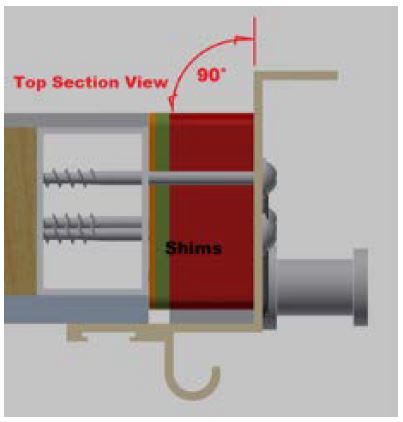
If your door has a rolled frame (fig 2), fit the space at the back of the opening between the door frame and sidewall frame. The screws should draw the frame back to the perpendicular position (Fig 3).
Step 7: Install the shims and install the screws
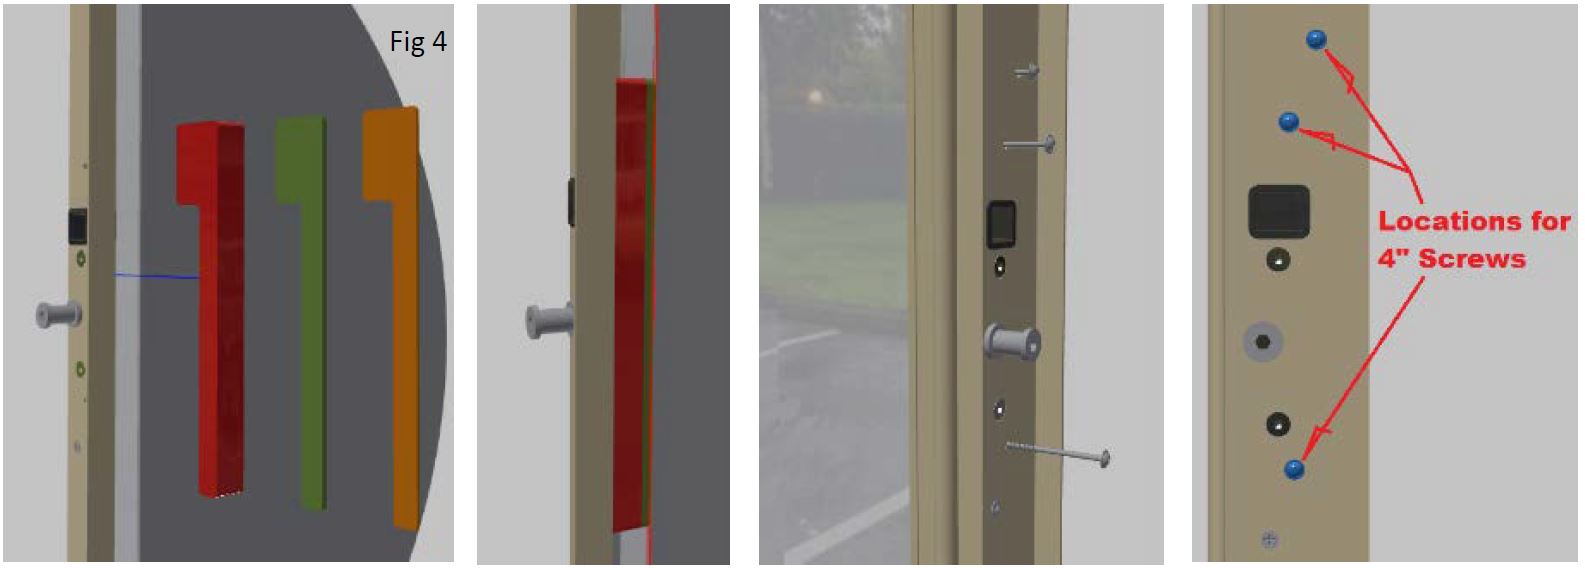
The shims should be placed so that the lip of the shim rests just above the deadbolt hole plug. (Fig 4)
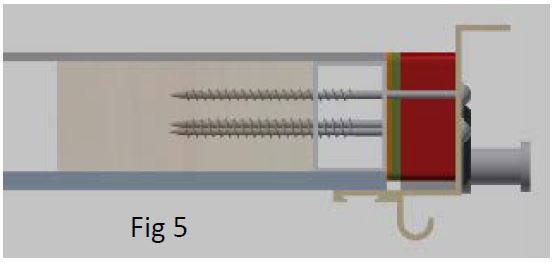
Install the screws straight into the sidewall frame. The screws should penetrate into the wood backer behind the aluminum sidewall skeleton. (Fig 5)
Step 8: Verify that the latch pawl is properly contacting the striker bolt.
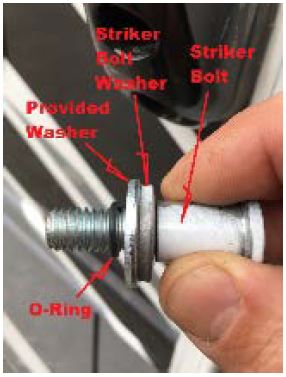
You should be able to see the latch pawl on the inside of the door when the door is closed. There should be a slight gap between the pawl and the head of the striker bolt. Another way to tell if there is clearance is to measure the gap between the door and the frame. There should be 1/8” to 5/32” of gap. Much more than that, the pawl will contact the head of the bolt. If this is the case, it may be necessary to use the washer provided in the kit under the washer of the striker. Use this washer ONLY if necessary.
Removing screws from the door frame or replacing the door entirely is a last resort item. We are trying to adjust the door without having to remove it from the opening. If you are unable to properly pass this stage, contact Forest River Georgetown Service at 574-206-7600 for further instructions. Georgetown Service at 574-206-7600 for further instructions. |
Step 9: Adjust the door.
The idea is to adjust the striker to allow the latch to reach the second stage position. The second stage position is when the door is completely closed.
Initially check to see if the door will close properly. Close the door very carefully. The door striker should align with the center of the latch (Fig 6). If the striker obviously does not align to the latch, then go to Step 10 to adjust the striker. Adjust accordingly.
If the striker aligns well, close the door to the first stage. If the latch does not click into position, go to Step 10 to adjust the striker.
If it clicks in place and holds securely, push the door to the second stage.
If it does not click into place relatively easy, go to Step 10 to adjust the striker.
If it clicks into place with reasonable force, pull on the door or push from the inside to check that the door is securely closed.
Activate the dead bolt to make sure it engages properly. Activate the latch to see if the dead bolt holds securely.
If everything is working properly, Go on to Step 11 to test the door.
Step 10: Adjust the striker.
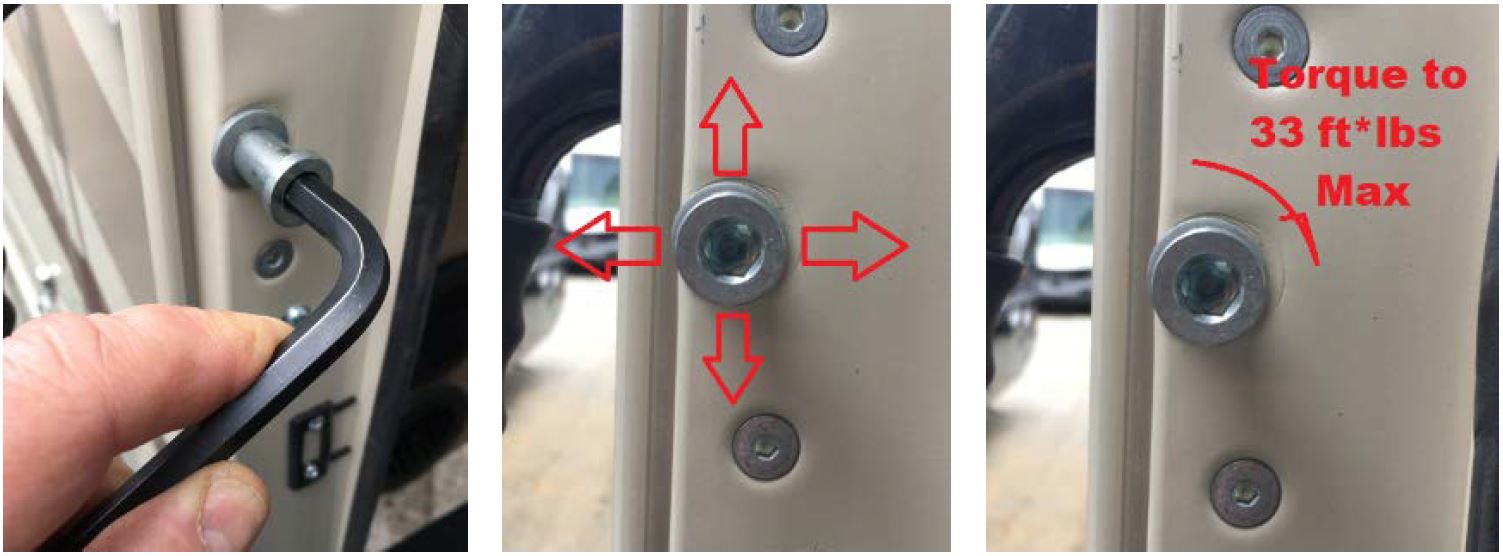
Use a 5/16” hex key to loosen and tighten the striker bolt. Move the striker up or down to align with the center of the latch on the door. Move the striker in or out to find the optimum position where the latch can reach the second stage and the door seals well. Typically this adjustment is to move the striker outboard. After adjustment, return to Step 9.
When the striker is finally adjusted to the optimal position, torque the bolt up to 33 ft-lbs.
Step 11: Test the door latch.
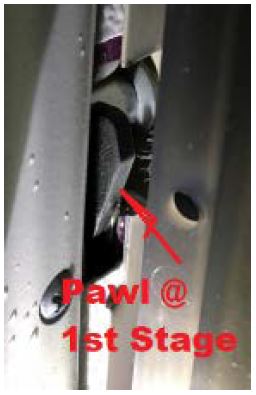
Shut the door easy at first. It should easily make it to the first stage position. Make sure it is secure in the first stage. (Fig 7)
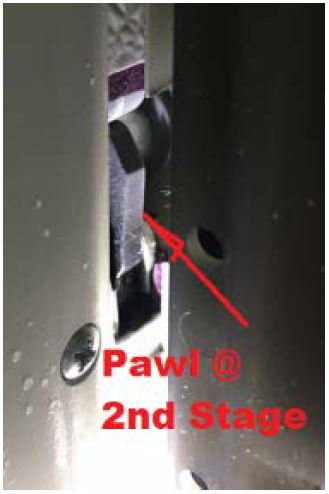
Next, shut the door with normal force. It should shut to the second stage position. Repeat to find the amount of force required to shut the door to the second stage. (Fig 8)
It should be approximately 10-12 lbs of force to shut the door properly. If you have to slam the door to reach the second stage, the striker needs to be adjusted outward to allow the latch to grab and still hold the seal around the door.
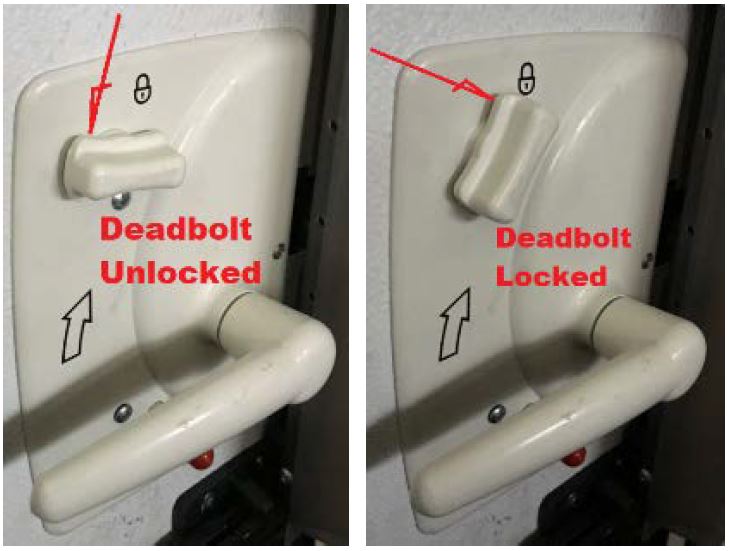
With the latch at the second stage, it should allow the dead bolt to be set to the lock position. (Fig 9) Activate the deadbolt to make sure it engages properly.
Open and shut the door in a normal manner at least 10 times to verify that the door latch is working properly.
Inspect around the latch and striker to verify that all connections are secure.
Step 12: Replace the trim around the door.
After you verify that the door latch is working as specified, place the trim back in it’s original location. Replace the screws, but do not over tighten. Replace the screw covers. Clean up the work area.
Step 13: Final check
Once the trim and all covers are back in place, repeat opening and closing the door 3 more times and verify that door is sealed all the way around. Verify that it closes in a normal manner and holds securely in the second stage position.
| If you are unable to get to this stage with good results, call 574-206-7600 for more help. |
Template for drilling top holes
 Loading...
4 Affected Products
Vehicles
FOREST RIVER | FR3 | 2018-2019 |
FOREST RIVER | GEORGETOWN | 2018-2019 |
7 Associated Documents
Recall 573 Report- Amendment 1
RCLRPT-18V234-1180.PDF 216.007KB
 Loading...
Defect Notice 573 Report
RCLRPT-18V234-5286.pdf 215.775KB
 Loading...
Recall Acknowledgement
RCAK-18V234-2922.pdf 245.959KB
 Loading...
Remedy Instructions and TSB
RCRIT-18V234-2414.pdf 731.439KB
 Loading...
Recall Quarterly Report #4, 2019-1
RCLQRT-18V234-4229.PDF 211.428KB
 Loading...
Recall Quarterly Report #2, 2018-3
RCLQRT-18V234-8192.PDF 214.607KB
 Loading...
Recall Quarterly Report #3, 2018-4
RCLQRT-18V234-4045.PDF 211.322KB
 Loading...
Latest Recalls Documents
| “This site contains affiliate links for which OEMDTC may be compensated” |
- BUFF OUT IMPERFECTIONS: Meguiar's Ultimate Compound removes scratches, swirls & oxidation for a clear, perfect finish
- SHOWROOM SHINE: Advanced car compound removes scratches, swirls, oxidation & water spots and restores color & clarity for a showroom shine in minutes
- CLEAR COAT SAFE: Auto compound safely removes scratches and other defects without hazing on clear coats & all gloss paints. Easy DIY fix by hand or da polisher
- LIKE-NEW SHINE: Meguiar's exclusive micro-abrasive technology quickly removes scratches & restores clarity and shine for a stunning, swirl-free finish.
- FAST & FLAWLESS: Meguiar's Ultimate Compound cuts fast, removes scratches and swirls without hazing, leaving a pro-detailer finish.
- 3-IN-ONE CERAMIC TECHNOLOGY: One 16 fl oz bottle of Nu Finish Once a Year Polish and Sealant, a car polish and paint sealant with 3-in-1 Ceramic Technology to repair, seal and repel
- REPAIRS SCRATCHES AND RENEWS SHINE: Long-lasting auto polish that helps repair fine swirls, scuffs and scratches while renewing the shine on paint and chrome, leaving a glossy, wet finish without any wax
- PREVENTS FUTURE SCRATCHES: Innovative Ceramic Technology forms an effective, durable protective barrier that helps prevent future scratches from forming and delivers extreme water beading for easier maintenance
- NO RUBBING OR BUFFING: Unique liquid polish that requires no rubbing or buffing and can even be applied in direct sunlight, unlike conventional car wax
- THE ONCE A YEAR CAR POLISH AND SEALANT: With just one application, you can polish and protect your car’s paint for an entire year* (*Based on U.S. average automatic car washes per year)
- EASY SCRATCH and SWIRL REPAIR - If your car has light scratches, swirls, or other marks - you can easily fix that with our Scratch & Swirl Remover Kit! Using the included buffer pad, our specially formulated compound will allow you to easily remove and "erase" years of wear and tear from your vehicles paint and overall appearance!
- ULTIMATE PAINT REPAIR- Not only will this remove swirls and scratches, it will restore the gloss and shine of your paint and bring it back to its original brilliance! The special rubbing compound will remove water spots, oxidation and other contaminants from your paint!
- PREMIUM CHEMICALS - We formulate all our products to ensure they are the best! Professional grade, but easy enough for anyone to use! We use only the absolute best chemicals and ensure there are no unnecessary color dyes or scents!
- ADVANCED SOLUTION FOR ALL PAINT TYPES - Car paint scratch repair is safe to use on all paints and colors. You can safely use it on any clearcoat, single stage, or multi stage paint!
- REVOLUTIONARY PRODUCT - This scratch remover for vehicles provides an effortless and secure way to remove scratches.
- The polish gives deep reflections & a hi-gloss paint finish
- Eliminates fine swirl marks
- Conditioning oils add depth of colour and maximum gloss prior to waxing, especially on dark coloured cars
- Quickly and gently removes fine swirls and towel marks for mirror-like reflections
- Safe and on all glossy paints, including clear coats.Pre-waxing glaze that prepares the surface for wax while offering deep reflections and high gloss
- EXCEPTIONAL RESULTS: Advanced technology formula provides a deep gloss and rich, swirl-free results, ensuring the luxury your vehicle deserves. This mirror glaze goes above and beyond to produce a high gloss finish with no defects left behind.
- NO MORE SWIRLS: Meguiar's M20508 Mirror Glaze Ultra Finishing Polish permanently and efficiently removes swirls and light defects from all paint in favor of a deep gloss. This powerful car polish gets the job done and leaves a lasting finish.
- STUNNING SHINE: Ultra Finishing Polish produces deep reflections and high gloss without leaving a mess behind. Treat your ride to a stunning shine with a professional polish that achieves an impeccable shine and gloss.
- EASY-TO-USE: Whether working by rotary, DA polisher, or hand, this professional polishing compound goes on and wipes off easily for a quick and easy cleanup. This Finishing Polish is the perfect way to enhance and refine paint and increase gloss.
- MULTIPLE WAYS TO APPLY: Formulated for use by hand, DA polisher, or rotary buffer. It's the perfect product to follow a more aggressive compound like Ultra Cut Compound M105 and before applying paint protection, like Pro Hybrid
 Ceramic Sealant M27.
- Silicone Free Means You Get True Results, What You See Is What You Get Even After Weeks Of Washing This Is A True Polish That Prepares Any Paint For The Perfect Sealant
- Works Great As A Final Step Product That Produces An Exceptional Shine
- Rapidly Removes Light Scratches, Key Scratches, And Most Imperfections, Removes Light Scratches And Swirl Marks Resorting Color And Shine
- Package Weight :15.0Lbs
- Brings Back That Showroom Shine, Removes Light Scratches And Swirl Marks Resorting Color And Shine, Body Shop Safe, Premium Gloss And Shine After Water Sanding
- Professional Scratch Repair: Designed specifically to eliminate fine scratches and imperfections from your car's paint, our V-Vaxy car scratch repair wax effectively addresses minor scuffs and superficial scratches, restoring your vehicle’s finish to its original brilliance
- Car Scratch Repair: Our car buff out scratch utilizes cutting-edge coating technology to create a water-repellent layer, significantly enhancing the durability and appearance of your vehicle's paint
- Multi-Effect Protection: Not only does our car scratch repair paste repair scratches, but it also provides a protective barrier that shields your vehicle’s paint from potential future damage, ensuring long-lasting effects
- Versatile Compatibility: Suitable for all car surfaces and colors, our product is effective on metal, wheels, paint, plastic, leather, rubber, and engines, making it an essential tool for any car owner
- Car Scratch Quickly Remover: Easy to use. Squeeze enough cream into the sponge. Just clear the scratches area,Then dip a little scratch repair agent with the sponge and wipe hard at the scratches until the scratch disappears, Finally wash with clean water
- DEFECT REMOVAL: M105 Ultra-Cut Compound is the perfect addition to your car cleaning supplies as it removes moderate to heavy paint defects like scratches, oxidation, swirls, acid rain, and even cuts through up to 1200 grit sanding marks
- ULTRA-FAST COMPOUNDING: Ultra-fast cutting ability removes 1200 grit or finer sanding marks, while micro-abrasives minimize further swirling for superior car cleaning while boosting gloss and shine
- ENHANCE GLOSS & SHINE: M205 Ultra Finishing Polish is a professional polish that permanently removes light swirls and holograms and further refines your paint while adding deep gloss, shine, and rich, swirl-free results
- CLEAR COAT SAFE: Safe and effective on all glossy paint finishes including clear coats. Both professional formulas work to remove paint defects and increase gloss without causing damage to the paint
- MULTIPLE WAYS TO APPLY: Formulated for use by hand, dual action polisher, or rotary buffer, these Mirror Glaze products can be applied in a versatile manner, allowing you to remove defects and leave paint with a deep, high gloss, swirl-free shine
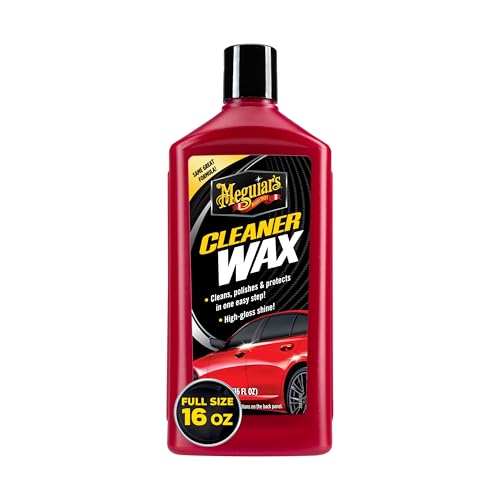
- CLEANER WAX: One-step liquid wax cleans your paint while you wax
- HIGH GLOSS SHINE: Rich conditioning oils polish and protect, leaving finish with a high gloss shine
- SAFE ON ALL GLOSSY FINISHES: Safely and effectively cleans surface contaminants and blemishes from all glossy paint finishes including clear coats and single-stage paint
- EASE OF USE: Easier to use than traditional carnauba wax
- VERSATILE APPLICATION: Can be applied by hand or Dual Action Polisher like Meguiar's MT300
- GOLD CLASS LUXURY: Indulge your vehicle with Meguiar's Gold Class Carnauba Plus Premium Liquid Wax Kit. Its premium carnauba-polymer blend provides car paint finishes with luxurious wax protection to help your car shine brilliantly.
- SAFE AND EFFECTIVE: The special blend of carnauba car wax and protective polymers in Meguiar's Gold Class Carnauba Plus Premium Liquid Wax are made to be safe and effective on all glossy paint types, including clear coats.
- ENHANCED HIGH GLOSS FORMULA: Experience an even richer shine and a deeper gloss with sharp, clear reflections thanks to the improved blended formula of Meguiar's Gold Class Carnauba Plus Premium Liquid Car Wax.
- EASY APPLICATION: Using the included high-quality soft foam applicator Meguiar's Gold Class Carnauba Plus Premium Liquid Wax easily glides on and off the surface, ensuring a smooth and even application for professional-looking results.
- VERSATILE APPLICATION: Whether you prefer precise hand application or the speed and efficiency of a Dual Action Polisher for car detailing, this Liquid Wax helps you achieve exceptional precision and shine with ease.
Last update on 2025-04-16 / Affiliate links / Images from Amazon Product Advertising API
This product presentation was made with AAWP plugin.

