
March 6, 2019
The damaged hitch may result in the towed vehicle separating from the motorhome, increasing the risk of a crash.
NHTSA Campaign Number: 19V177
Manufacturer Jayco , Inc.
Components TRAILER HITCHES
Potential Number of Units Affected 8
Summary
Jayco, Inc. (Jayco) is recalling certain 2019-2020 Jayco Embark motorhomes. While the motorhome was being delivered, the hitch may have been damaged, compromising the motorhome’s ability to safely tow vehicles.
Remedy
Jayco has notified owners, and dealers will replace the hitch, free of charge. The recall began March 15, 2019. Owners may contact Jayco customer service at 1-800-517-9137. Jayco’s number for this recall is 9903429.
Notes
Owners may also contact the National Highway Traffic Safety Administration Vehicle Safety Hotline at 1-888-327-4236 (TTY 1-800-424-9153), or go to www.safercar.gov.
Hitch Receiver
| Bulletin Type: | Safety Recall | Publication Date: | March 2019 |
| Recall #(s): |
19V-177 Jayco 19V-178 Entegra |
Make(s): | Jayco Entegra |
| Job Code(s): | 9903429 | Model(s): | Embark/Reatta |
| Flat Rate(s): | 2 hours | Model Year(s): | 2019-2020 |
REQUIRES PARTS KIT
| Incident: | Receiver hitch damaged during delivery of chassis. |
| Affected Units: |
2019 Embark K1NE0062,0063 NG0054-0056 2019 Reatta K1NE8077,8078 NG8062,8063, 8065, 8066, 8067
|
| Parts Kit: | Parts Kit #:19V-177/78 |
|
1 - Receiver hitch 2 - Spacer blocks 4 - Bolts 1/2-13 x 2-1/2" GR8 4 - Bolts 1/2-13 x 2-1/4 " GR8 8 - Nuts, Flange 1/2-13 GR8 |
|
| Misc. Tools & Supplies: |
Screw gun with #2 square drive bit (6 inch long) Socket adapter for 3/8" sockets Reciprocating saw with a metal cutting blade Ratchet wrench with 3/4", 5/16", 7/16" sockets Impact driver with 3/4" and 9/16" impact sockets 3/8" nutsetter bit for screw gun Wrenches - 7/16", 3/4", 15/16" open/box end Large adjustable wrench or (1-1/8" open end wrench) Tape measure Flashlight, floor jack, safety glasses, gloves Hammer and a screw driver (for aligning spacer blocks) |
| Parts Return Information: | Not applicable |
REPAIR INSTRUCTIONS
Remove the old hitch. Save all hardware unless otherwise noted in these instructions.
FIG 1 Shows the parts in the kit: Hitch, hardware and spacer blocks.
FIG 2 Open the engine compartment cover
FIG 3 & 4
- Cut the wire ties holding harnesses on the hitch. (approximately 4 of them)
FIG 5 & 6
- Remove 4 bolts from the 7 way trailer plug cover. Use 5/16 socket, socket adapter and screw gun.
- Save the hardware for re-install. Note that the cover is oriented so it opens upward.
FIG 7:
- Unplug the harness from backside of the 7 pin trailer plug.
- Remove the 7 pin plug the steel bracket attached to the hitch.
FIG 8:
- If the steel bracket does NOT include an air-line coupler (2019 units), continue to Fig 13.
- If the bracket has an air coupler (2020 units) for the Tow Brake, it must be removed (Fig 9-12).
FIG 9 & 10:
- Pull the loom off of the air hose, and off the back of the air-line coupler.
- Place an adjustable wrench (or 1-1/8" wrench) on the large nut on the front side of the steel bracket (Refer to Fig 11)
FIG 11:
- Fig 11 shows how the air hose coupler is attached to the steel bracket.
- Unscrew the smaller nut on the back of the bracket using the 15/16" wrench.
- The smaller nut is attached to the angled fitting which will unscrew from the larger fitting.
- Remove the large 1-1/4" nut and the washer on the back of the steel bracket.
- Remove the air coupler parts from the steel bracket.
FIG 12:
- Air coupler parts shown disassembled and in the order they came apart. (Save all the parts)
- Remove the 2 long bolts on the steel bracket.
- Use a 7/16 socket, socket adapter, screw gun and the 7/16" wrench. Pull the bolts out of the bracket. (save hardware for re-install) FIG 14:
- Remove the steel bracket.
- Push it back toward the engine, then rotate it down around the hitch bar.
- Pull it off of the hitch bar.
FIG 15:
- Remove screws holding the shields together between the radiator and the rear cap.
- There are 2 screws joining the shields, plus a hex head TEK screw holding the hose clamp in place FIG 16:
- Remove the TEK hex head screw holding the hose clamp at the back of the shield.
- Use the 3/8" nutsetter bit or the socket adapter and a 3/8" socket to remove it.
FIG 17:
- There are 2 additional screws holding the shields in place.
- Looking at the left rear of the coach, one screw will be up above the driver side back-up light.
- You can get to that screw without removing the light, but you have get to it from underneath the coach.
- The screw goes into the rear lip of the shield similar to the TEK screw in Fig 16.
FIG 18:
- Remove the exhaust tip in order to access the last screw holding the shields.
- Loosen the two clamp nuts at the side of the exhaust tip to remove the tip.
- Use the 9/16" impact socket and impact driver to loosen the two nuts.
- Pull the exhaust tip off.
FIG 19:
- Remove the final screw holding the shields in place.
FIG 20:
- Remove the shields between rear cap and radiator.
- Remove them one at a time, move the harness at the back out of the way as you lift the shield.
- Each shield must slide toward the center, then lift from the rear and tilt toward the radiator.
- Lift carefully out of the opening taking care not to damage the radiator.
FIG 21
FIG 21:
FIG 22:
- Remove only thenuts closest to the end ofboth eye bolts holding the mud flap in place (circled).
- There is one eye bolt on each side of the hitch attached to a small angle bracket (use 3/4" socket, ratchet, and 3/4" wrench)
- IMPORTANT: ONLY remove the nut closest to the end of the eye bolt. The nut closest to the eye bolt "loop" will retain the proper positioning for the mud flap if it is not turned or moved. Use the wrench and socket to separate the nuts, but only turn the nut at the end of the eye bolt.
- Lower the eye bolts and the mud flap out of the way.
REMOVE THE DAMAGED HITCH
- There are four 1/2" Grade 8 bolts holding the hitch to the frame (on each side of the hitch).
- In the photo; there are three nuts (circled) and one hidden holding the angle bracket for the mud flap eye bolt.
- You will need the impact driver, 3/4" impact socket, and the 3/4" wrench.
FIG 24:
- NOTE: Before removing any nuts and bolts:
As you look at Fig 23, the two bolts toward the rear of the vehicle (circled in yellow) are spaced closer together than the bolt holding the angle bracket and the one farther forward (circled). The bolts spaced farthest apart (angle bracket bolt and one further forward) go through a spacer block shown in Fig 24. The spacer block stays where it is and will be used to install the new hitch. There will be one existing spacer block on each rail of the hitch.
- This cavity in Fig 24, is behind the mud flap looking up and toward the rear of the vehicle (on each side).
FIG 25:
FIG 26:
- Remove the four Grade 8 1/2 inch bolts and nuts on each side of the hitch. Discard this hardware.
- Use the 3/4" wrench on the top of the bolts, and 3/4" impact socket and impact driver on the nuts.
- Spacers (1 each side of the hitch) will remain up on the frame rail.
FIG 27 & 28:
- Use the reciprocating saw to cut the old hitch in two pieces.
- The old hitch cannot be removed in one piece without removing the rear cap so it must be cut.
- Place the saw blade between the letters "U" and "R" on the CURT label on the hitch (Fig 27).
- Take extra care to make sure cables are all clear of the cutting area.
- Arrow in Fig 28 pointing to the saw blade on the hitch.
- Use your knee to support the hitch as you saw through it, to keep the blade from binding.
FIG 31:
- New spacer block is made to fit the holes closest together on the new hitch.
- The spacer blocks do NOT install on the hitch; they go up in the frame rail. This picture is just to reference the holes on the hitch versus the holes in the spacer block.
- The old spacer (dashed box) will remain where it was on the frame rail and attach with the bolts farthest apart.
- The new spacer block (from kit) will go end to end with the old spacer block on the frame rail.
FIG 32:
- Place the new spacer blocks from the kit on the frame rail shown in the photo.
- New spacer blocks go on top of the frame rail, and will butt against the spacer that was there in Fig 24.
- This can be a tight fit, so you may have to get a hammer and screwdriver to get them in place.
- Make sure the holes are lined up with the bolt holes through the frame rail.
FIG 33:
- Tap the spacers in place with a hammer so bolts fit through the holes (if necessary).
- You may have to use the floor jack and raise the radiator slightly to help insert the spacers.
- NOTE: This picture is on the passenger side of the vehicle.
FIG 34:
- With the new spacer block in place, use two 2-1/2" bolts (from the kit) and place them from the top down through the spacer block and through the frame rail.
- Since the hitch will now be mounted under the frame rail, the spacer blocks guarantee the bolt lengths remain the same as they were with the old hitch.
- NOTE: This photo is on the passenger side of the vehicle
FIG 35:
- 1/2 x 2-1/2" Grade 8 bolts in place on the driver side of the hitch (as viewed from the rear of the vehicle).
- Second spacer block from the kit has been installed on the frame rail.
- NOTE: This photo is on the driver side. FIG 36:
- Place the new hitch up under the frame rails and line up the holes for the two 1/2 x 2-1/2" Grade 8 bolts.
- Place a nut (from the kit) on each bolt on both sides of the hitch. DO NOT TIGHTEN YET.
FIG 37:
- Make sure the existing spacer from Fig 24 is up on the frame rail, and aligned with the bolt holes.
- The two spacers should butt against each other or at least be lined up with each other on the frame rail.
- USE NEW HARDWARE FROM THE KIT TO REINSTALL THE NEW HITCH.
- Place two new 1/2 x 2-1/4" Grade 8 bolts (from the kit) down through the spacer, through the frame, and through the hitch.
- The rear most of the two holes will have the angle bracket for the mud flap.
- Place a new nut (from the kit) on each bolt.
- Repeat steps 32 through 37 on the other side of the hitch.
- Use the 3/4" wrench on the top of the bolts while you install the 8 bolts with the impact and 3/4" impact socket. DO NOT COMPLETELY TIGHTEN ALL 8 NUTS WITH THE IMPACT GUN.
FIG 38:
- Photo shows driver side of the hitch bolted up with the angle bracket in place for the mud flap.
- ALL EIGHT 1/2X 13 NUTS UNDER THE HITCH MUST BE TORQUED USING A TORQUE WRENCH.
- TORQUE ALL 8 HITCH NUTS TO 74 FT/LBS
FIG 39:
- Re-attach the mud flap with the eye bolts to the angle brackets on each side of the hitch.
- Remember do not turn the nut closest to the "loop" end, only remove the nut on the end of the bolt.
- Use 3/4" ratchet and socket along with the 3/4" wrench to tighten.
FIG 40:
- The double harness (arrow) coming from the front of the RV on the passenger side rear, goes behind the hitch.
FIG 41:
- The harness that splits off the rear harness goes around under the rear harness and down over the back of the hitch.
- One of those harnesses will have the round plug for the 7 pin trailer plug.
FIG 42:
- Re-install the tow brake bracket on the hitch.
- It should be spaced approximately 1-3/8" from the safety chain slot (arrow).
- Re-install the long bolts on the tow brake bracket.
- Use 7/16" socket, 7/16" wrench, and socket adapter for drill.
FIG 44:
- Re-install the air hose coupler (if equipped) (MY2019).
- Re assemble in reverse of steps earlier (Fig 11 & 12).
- Rubber cover "mounting ring" for air coupler attaches on the back side of the bracket Airline coupler should angle down when tightened.
- Re-attach air hose to the coupling (it just pushes back on).
- Re-wrap air hose in the plastic loom.
- Insert the square 7 way plug cover through the tow brake bracket. (Cover should open upward) Re-connect the round plug on the back of the 7 pin trailer plug housing.
- Re-install 4 bolts holding 7 pin cover to the tow brake bracket. (5/16" socket, socket adapter, and screw gun)
FIG 45 & 46:
- Replace the shields back in the opening at the rear of the vehicle.
- Lip of the shields goes to the rear of the vehicle. Angle them in as shown.
- Driver side shield first, then the passenger side. Passenger side is on top in the center. Make sure the harness along the back is not pinched by the back of the shields
FIG 47:
- Replace the TEK screw in the P clamp for the rear harness. (3/8" nutsetter or 3/8" socket) Replace the screw above the driver side back up light.
FIG 48:
- Re-install the screw above the exhaust tip.
FIG 49:
FIG 50:
- Wire tie the harness back up to the hitch. (4 wire ties) Trim the wire tie tails.
- None of the wire harnesses should be hanging down below the hitch.
- Discard any old hardware remaining.
VALIDATE THE REPAIR:
- Check airline on the tow brake coupler for leaks.
- Verify 7 pin connector plug hinges upwards to prevent water intrusion.
Safety Recall: Jayco 19V-177
Entegra 19V-178
March 2019
IMPORTANT SAFETY RECALL
This Notice Applies to Your Recreational Vehicle «vin»
Dear Valued Customer:
This notice is sent to you in accordance with the National Traffic and Motor Vehicle Safety Act.
Jayco has decided that a defect, which relates to motor vehicle safety exits in certain Model Year 2019 Jayco Embark and Entegra Reatta Class A motorhomes.
| Reason for this recall | The hitch receiver on your motorhome may have been compromised during delivery of the chassis to our production facility. The hitch may have fractured at the receiver opening. The fracture may not be visible to the naked eye. Failure of the hitch can increase the risk of crash or injury. |
| Recall Remedy | An authorized Dealer will remove and replace the hitch free of charge. The Recall Remedy will take aproxiatmetly 2 hours. PLEASE DO NOT USE THE HITCH UNTIL THE RECALL REMEDY IS PERFORMED . |
| What we need you to do | Please contact a Jayco Authorized Dealer as soon as possible to schedule an appointment to have this remedy completed free of charge. |
If you had this repair completed prior to receipt of this recall notice, you may be eligible to receive reimbursement for the cost of obtaining a pre-notification remedy of the problem associated with this recall.
If you take your recreational vehicle to your dealer on the agreed service date and the dealer does not remedy this condition on that date or within three (3) days, please contact our Customer Service Department at 800-517-9137. If after contacting your dealer and Customer Service you are not able to have the safety defect remedied without charge and/or within a reasonable time, you may wish to submit a written complaint to the Administrator, national Highway Traffic Safety Administration, 1200 New Jersey Avenue, SE., Washington, DC 20590; or call the toll-free Vehicle Safety Hotline at 1-888-3274236 (TTY: 1-800-424-9153): or go to https://www.safercar.gov. Federal regulations require that any vehicle lessor receiving this recall notice must forward a copy of this notice to the lessee within ten days.
We certainly regret this inconvenience; however, your safety is our most important priority.
Sincerely,
Jayco Motorized/Entegra Coach
2 Affected Products
Vehicle
| JAYCO | EMBARK | 2019-2020 |
10 Associated Documents
Remedy Instructions and TSB
RCRIT-19V177-5189.pdf 1342.369KB
Recall Notice 573 Report
RCLRPT-19V177-4211.PDF 212.603KB
Recall Quarterly Report #1, 2019-1
RCLQRT-19V177-4999.PDF 211.127KB
Recall Acknowledgement
RCAK-19V177-8999.pdf 280.747KB
Manufacturer Notices(to Dealers,etc) – 19V-177 178 Dlr Ltr
RCMN-19V177-6757.pdf 185.347KB
Miscellaneous Document – 19V-177 178 Order Form
RMISC-19V177-9509.pdf 153.695KB
ISSUED Owner Notification Letter(Part 577)
RCONL-19V177-2496.pdf 51.155KB
Recall Quarterly Report #2, 2019-2
RCLQRT-19V177-7357.PDF 211.207KB
Recall Quarterly Report #3, 2019-3
RCLQRT-19V177-8888.PDF 211.286KB
Recall Quarterly Report #4, 2019-4
RCLQRT-19V177-4656.PDF 211.391KB
Latest Recalls Documents

- HITCH FOR TRAILERS & FIFTH WHEELS: The Stromberg Carlson CC-300 Adjustable Accessory Hitch creates a 2" hitch on travel trailers and fifth wheels, providing an ideal solution for your RV trailer hitch needs. This camper hitch receiver is ideal for mounting bike racks and cargo carriers.
- CLASS I AND CLASS II OPTIONS: This camper trailer hitch can be bolted on as a Class I or welded on as a Class II hitch to the frame, ensuring compatibility with various vehicle types including cars and trailers. It's a reliable adjustable trailer hitch that adapts to your requirements.
- DURABLE CONSTRUCTION: Crafted from durable alloy steel with a powder-coated finish, the Stromberg Carlson hitch for the back of the camper is designed for long-lasting performance. It mounts to the side wall of the frame or the horizontal wall of a "C" channel or "I" beam with angled hardware.
- USAGE WARNING: Specifically designed as an accessory hitch, this adjustable truck hitch is not for towing cars or boats if bolted in Class I configuration. It’s ideal for carrying bike racks and cargo carriers, providing a safe and secure solution for all your travel trailer hitch needs.
- TRUSTED FAMILY BRAND: Since 1959, Stromberg Carlson has been a third-generation, family-owned company committed to providing high-quality RV products. Their experience and dedication ensure reliable and durable solutions for all your camping and travel needs.


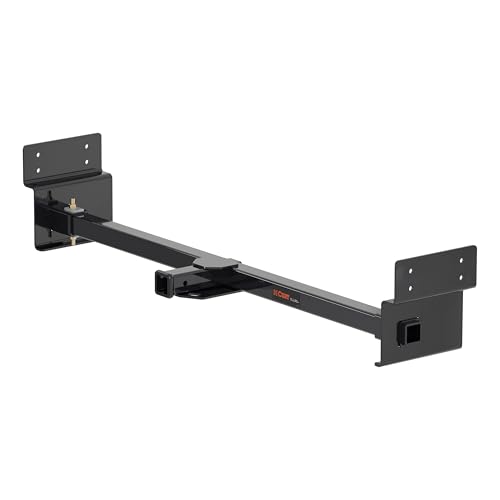
- DEPENDABLE STRENGTH — This adjustable RV trailer hitch is rated for 3,500 lbs. gross trailer weight and 350 lbs. tongue weight, limited to the lowest-rated towing component, RV frame capacity and vehicle manufacturer’s stated limits.
- VERSATILE DESIGN — This camper trailer hitch adds a standard 2-inch x 2-inch receiver to compatible RV, camper and motorhome frames for towing accessories, cargo carriers, trailers or small vehicle towing; not rated for weight distribution use.
- EASY TO INSTALL — Three-piece adjustable design fits RV frames up to 72 inches wide and secures with included grade-8 hardware; measure your RV frame width and confirm frame suitability before ordering or installation.
- FULLY TESTED — CURT RV hitch designs are tested according to SAE J684 standards for towing safety and reliability, with welded safety chain loops for properly connecting trailer safety chains.
- RUST, CHIP, UV-RESISTANT — This RV towing hitch is protected with rust-resistant liquid A-coat and durable gloss black powder coat for long-term resistance to corrosion, chipping and UV exposure; not compatible with vertical hanging bike racks.
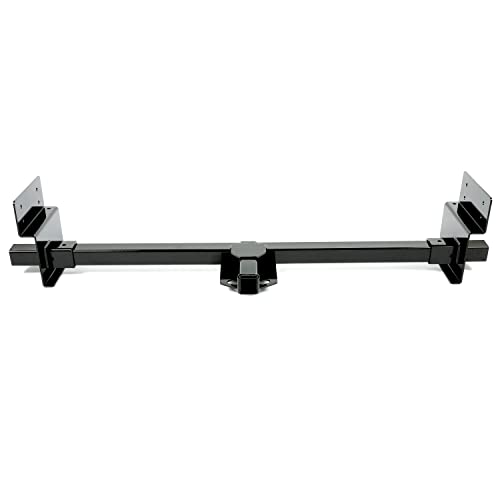
- Premium Steel: Rated for a trailer weight of 3,500 lbs and a tongue weight of 350 lbs. Constructed from high-grade steel to ensure stable and reliable towing performance
- Universal Design: RV trailer hitch Features 2-inch receiver compatible with different accessories such as ball mounts, cargo racks, and bike racks, but does not support vertical hanging bike racks
- Easy Installation: Direct bolt on installation. Three-piece adjustable design fits frames up to 72 inches wide. Includes high-strength hardware for drill-free installation
- Durable Material:RV Receiver hitch 2" are made of high-grade steel for good strength while towing. Durable and reliable under different weather conditions
- Package: You will receive 1 X Trailer Hitch, others as shown in pictures. Note: Instructions & mounting hardware are included

- Quick, Easy Installation: No need for complicated welding to make the Ohuhu Hitch Receiver work. You can hook it up to a bicycle rack, RV tire rack, cargo rack or other accessories. Simply install it on the bumper and you are good to go.
- Sturdy and Durable: Pulls its weight, every time! Tough and durable for the long haul, this hitch receiver is constructed of premium steel. With a dual coating finish of E-coat and Black Powder Coating, this bumper hitch is protected from rust and corrosion. Get the job done right with the Ohuhu Trailer Receiver!
- Use Only For 2"x2" Square Tubes: Designed specifically for 4"x4" bumpers, this receiver is made for use with 2"x2" square tubes. It can allow for a wide variety of towing options.
- 350lbs Tongue Weight Capacity: This RV trailer hitch is rated for 3,500 lbs gross trailer weight and 350 lbs tongue weight (limited to lowest-rated towing component).
- Accessories Included: Also included with your purchase are a set of 5/8" hitch pins and 1 rubber cap. Use the pins to secure the rack once installed on the hitch receiver to make it more stable, and the rubber cap to cover the hitch receiver when not in use.
This product presentation was made with AAWP plugin.