
November 17, 2020 NHTSA CAMPAIGN NUMBER: 20V711000
Water may get into the BIM/BIR and create electrical arcing, increasing the risk of a fire.
NHTSA Campaign Number: 20V711
Manufacturer Thor Motor Coach
Components ELECTRICAL SYSTEM
Potential Number of Units Affected 1,074
Summary
Thor Motor Coach (TMC) is recalling certain 2020-2021 Daybreak, Four Winds, Chateau, Freedom Elite, Quantum motorhomes built on a Chevrolet chassis. The BIM (Battery Isolation Manager)/BIR (Battery Isolation Relay) is not watertight when exposed to engine compartment heat.
Remedy
TMC will notify owners, and dealers will replace the BIM/BIR with a Trombetta solenoid, free of charge. The recall began January 13, 2021. Owners may contact TMC customer service at 1-877-855-2867. TMC’s number for this recall is RC000206.
Notes
Owners may also contact the National Highway Traffic Safety Administration Vehicle Safety Hotline at 1-888-327-4236 (TTY 1-800-424-9153), or go to www.safercar.gov.
Issue:
It has been discovered that on certain model year 2020/2021 Chateau, Daybreak, Four Winds, Freedom Elite, and Quantum Motorhomes built on a Chevy chassis, expansion and contraction of the plastic body of the BIM (battery Isolation Manager)/BIR (Battery Isolation Relay) from heat in the engine compartment causes it to be susceptible to moisture inside the body, which in turn produces arcing of the internal components. This internal arcing can cause heating, or the possibility of a fire.
Shop Supplies Needed:
(3) ¼” self tapping screw
(4) #8 self tapping pan head screws
(1) ¼” star washer
Tools Required:
½” socket for torque wrench (for battery cables)
3/8” screw gun bit (for ¼” self tapping screws)
5/16” socket (to remove overflow bottle)
Electrical Tape
Screw Gun
Square head screw gun bit (for #8 self tapping screws)
Wire Crimpers
YouTube Video Instructions Found Here:
Disclaimer– Video is for installation of recall repair on a Ford Chassis. Steps will vary for Chevy Chassis.
Instructions:
1. Disconnect battery cable on the negative post of the house battery located in the step well.
2. Disconnect battery cable from negative post of the chassis battery located under the hood.
3. Locate BIM/BIR mounted on passenger’s side inside fender.
4. Remove the chassis battery cable and the house battery cable from the BIM/BIR and remove BIM/BIR.
Note: The BIM/BIR needs to be returned to Thor Motor Coach for payment of the recall repairs.
5. Remove the screws holding the BIM/BIR to the inside fender.
6. Remove ground wire
7. Open the loom for the dash switch, locate the white and white with black tracer. Cut both wires.
8. Open the loom for the ignition power, locate the yellow wire and cut.
9. Find a good clearance where BIM/BIR was installed to mount the Trombetta solenoid. Make sure it is far away enough from the solenoid installed on fender below where the BIM/BIR was installed to avoid sparking.
10. Start a ¼” self-tapping hex head screw at the installation mark on the fender wall. Slide Trombetta solenoid bracket into place on the self-tapping hex head screw and secure.
11. Install a ¼” self-tapping hex head on the other side of the bracket of the Trombetta solenoid.
12. Install ground wire, black wire with ring terminal, above Trombetta solenoid on the inside of the fender by using a ¼” self-tapping hex head using a 3/8” bit. NOTE: Must use a star washer between the ring terminal and fender.
13. Mount the Isolater Relay Delay (IRD) beside the Trombetta solenoid and along the seam of the fender with 1-2 – #8 self-tapping pan head screws.
14. Verify which cable is coming from the chassis battery by tracing is back to the chassis battery. Remove the washer and nut from the Trombetta solenoid and secure the chassis battery cable to the large terminal post of the Trombetta solenoid closest to the firewall with the washer and nut.
Note: If either battery cable ring terminal is bent –– straighten before securing.
15. Secure the house battery cable to the other large terminal post (towards the front) of the Trombetta solenoid – this house battery is to be secured together with the white wire of the emergency start switch. Put the battery cable on the post first, then place the white wire on top and secure with washer and nut.
16. Tighten nuts on both battery cables using a torque wrench to 45 inch lbs.
17. Locate and cut yellow ignition power wire, strip back, and connect to yellow wire w/ yellow butt connector from the fuse holder. Crimp and heat shrink using a torch or electric heat gun. Using electrical tape, tape both ends of the yellow wires.
18. Locate cut white wire and white with black tracer from the emergency start switch and strip back both wires. Connect white wires with white butt connector and white with black wires white with black butt connector. Crimp both wires and heat shrink.
Use electrical tape to tape both ends of the wires.
19. Zip tie fuse holders and wires together as shown below to keep secure.
20. Reconnect house battery cable in the step well.
21. Reconnect chassis battery cable under the hood.
22. Test the emergency start switch by pushing the switch and listen for an audible clicking noise. This indicates the connection is proper. If you do not hear the clicking noise, check fuse holder and wire connections (white & white with black wires).
23. Start the engine, after 15-20 seconds, you should hear an audible clicking noise. This indicates the connection is proper. If you do not hear the clicking noise, check fuse holder and yellow wire connections.
SEOCONTENT-START
Thor Motor Coach
Recall Repair Instructions
Thor Motor Coach
1-877-500-1020
Page 1
Recall #
20V 711
2020 554
Description/Title:
BIM/BIR Replacement
Expanded Scope
Affected Product Line(s):
Certain Model Year 2020/2021 Chateau, Daybreak, Four Winds, Freedom Elite, and Quantum motorhomes built on a Chevy chassis
Service Campaign # :
RC000206
Released Date:
12/29/2020
Repair Code:
TMCRC80497V
Document Date:
12/29/2020
Time Allowed:
0.75
Document Revision:
A
Issue:
Parts Required:
TMC Recall Part #0492597
(All recall parts are sent via Ground Shipping.)
Thor Motor Coach
Recall Repair Instructions
Thor Motor Coach
1-877-500-1020
Page 2
Thor Motor Coach
Recall Repair Instructions
Thor Motor Coach
1-877-500-1020
Page 8
If nearby, verify the 2 gauge cable that runs from the Trombetta is supported away from the engine exhaust manifold and the rest of the exhaust, covering the area under the hood to the rear of the cab. If the 2 gauge cable is not secured away from the exhaust manifold or the rest of the exhaust, secure as indicated in the following image.
Thor Motor Coach
Recall Repair Instructions
Thor Motor Coach
1-877-500-1020
Page 9
Battery Cable
NOT
PROPERLY SECURED!
PROPERLY SECURED!
Thor Motor Coach
Recall Repair Instructions
Thor Motor Coach
1-877-500-1020
Page 10
Secure battery cables tight to the chassis frame. Keep battery cable away from exhaust and manifold.
NOT
PROPERLY SECURED!
PROPERLY SECURED!
*************************************************************************************************************
IMPORTANT SAFETY RECALL
This notice applies to your vehicle: «VIN»
«Owner_name»
«Street»
«City», «State» «Zip»
Dear «Owner_name»:
This notice is sent to you in accordance with the requirements of the National Traffic and Motor Vehicle Safety Act. Thor Motor Coach
(TMC) has decided that a defect which relates to motor vehicle safety exists in certain model year 2020/2021 Chateau, Daybreak, Four
Winds, Freedom Elite, and Quantum motorhomes. As a result, TMC is conducting a safety recall. We apologize for any inconvenience
this action may cause you; however your safety and continued satisfaction are of the utmost importance to us.
It has been discovered that on certain model year 2020/2021 Chateau, Daybreak, Four Winds, Freedom Elite,
and Quantum Motorhomes built on a Chevy chassis, expansion and contraction of the plastic body of the
BIM (battery Isolation Manager)/BIR (Battery Isolation Relay) from heat in the engine compartment causes
it to be susceptible to moisture inside the body, which in turn produces arcing of the internal components.
This internal arcing can cause heating, or the possibility of a fire.
TMC has contacted your selling dealer and has instructed them on how to replace the BIM/BIR. This will
be done at no cost to you the owner. The remedy should take approximately 45 minutes to perform.
At your earliest convenience, please contact your dealer and schedule an appointment to have this remedy
completed. To locate the nearest authorized TMC service center, please visit
https://www.thormotorcoach.com/locate-a-service-center/. If you have questions concerning this recall or
if you need any assistance, please contact the TMC Warranty/Service Department by mail at TMC, P.O.
Box 1486, Elkhart, IN 46515-1486, by phone at 877-855-2867, or email at [email protected].
If you had appropriate repairs completed prior to receipt of this recall notice, and if you incurred any direct
cost in connection with obtaining such repair, you may be eligible to receive reimbursement from TMC by
contacting the TMC Warranty/Service Department.
If after contacting TMC Customer Service you are still not satisfied we have done our best to remedy this situation, you may also submit
a written complaint to: Administrator, National Highway Traffic Safety Administration, 1200 New Jersey Avenue, SE, Washington,
DC 20590. You may call the toll-free Vehicle Safety Hotline at 1-888-327-4236 (TTY:1-800-424-9153; or go to
https://www.safercar.gov.) Federal regulations require that any vehicle lessor receiving this recall notice must forward a copy of this
notice to the lessee within ten days.
Thank you for your attention and cooperation in this matter.
Sincerely,
Thor Motor Coach
Hanah Klodzinski
Recall Compliance Coordinator
cc: National Highway Traffic Safety Administration (NHTSA)
Reason for
this recall
What we need
you to do
RECREATIONAL VEHICLE
SAFETY RECALL NOTICE
Safety Recall: 20V-711
Safety Advisory: RC000206
January 2021
What we
will do
*************************************************************************************************************
IMPORTANT SAFETY RECALL
RC000206
This notice applies to vehicle: «VIN»
«Dealer_name»
«Street»
«City», «State» «Zip»
Dear Dealer:
This Safety Recall Notice is sent to you in accordance with the requirements of the United States National Traffic and Motor Vehicle Safety Act and The Canadian Motor Vehicle Safety Act and is important for your safety.
Thor Motor Coach (TMC) decided that a defect which relates to motor vehicle safety exists in certain models of the below listed motorhomes.
It has been discovered that on certain model year 2020/2021 Chateau, Daybreak, Four Winds, Freedom Elite, and Quantum Motorhomes built on a Chevy chassis, expansion and contraction of the plastic body of the BIM (battery Isolation Manager)/BIR (Battery Isolation Relay) from heat in the engine compartment causes it to be susceptible to moisture inside the body, which in turn produces arcing of the internal components. This internal arcing can cause heating, or the possibility of a fire.
The required action is to replace the BIM/BIR with a Trombetta solenoid.
Dealers that have stock units impacted by this recall can access the full list of affected VINs sold to their dealership by accessing the “Service Campaign” portion of the TMC Advantage Web Portal. If any unit on this list has been retail sold you are asked to notify the retail owner as soon as possible of this recall because their vehicle was not registered at the time the retail notice was mailed. Please immediately register any retail sold units on this list. As a reminder, you are required by law to complete this recall on any stock units in inventory prior to retail sale. Any vehicle lessor receiving this notice must forward a copy to the lessee within 10 days.
If you have questions concerning this recall, please contact the TMC Warranty/Service Department by mail at TMC, P.O. Box 1486, Elkhart, IN 46515-1486, or by phone at (877) 500-1020.
We apologize for this inconvenience; however, we have taken this action in the interest of customer safety and continued satisfaction with our products.
Sincerely,
Hanah Klodzinski
Recall Compliance Coordinator
Re: NHTSA Recall No. 20V-711
Transport Canada No. 2020-554
*************************************************************************************************************
*************************************************************************************************************
SEOCONTENT-END
10 Affected Products
Vehicles
| MAKE | MODEL | YEAR |
| THOR MOTOR COACH | CHATEAU | 2020-2021 |
| THOR MOTOR COACH | DAYBREAK | 2020-2021 |
| THOR MOTOR COACH | FOUR WINDS | 2020-2021 |
| THOR MOTOR COACH | FREEDOM ELITE | 2020-2021 |
| THOR MOTOR COACH | QUANTUM | 2020-2021 |
10 Associated Documents
ISSUED Owner Notification Letter(Part 577)
RCONL-20V711-5835.pdf 37.282KB
Manufacturer Notices(to Dealers,etc)
RCMN-20V711-3148.pdf 139.258KB
Remedy Instructions and TSB
RCRIT-20V711-7005.pdf 2534.907KB
Remedy Instructions and TSB
RCRIT-20V711-8742.pdf 2534.907KB
Manufacturer Notices(to Dealers,etc)
RCMN-20V711-5278.pdf 139.258KB
Recall Quarterly Report #1, 2021-1
RCLQRT-20V711-3913.PDF 211.126KB
Recall Quarterly Report #2, 2021-2
RCLQRT-20V711-2837.PDF 211.227KB
Recall Acknowledgement
RCAK-20V711-6932.pdf 244.877KB
Defect Notice 573 Report
RCLRPT-20V711-4134.PDF 217.757KB
Recall Quarterly Report #3, 2021-3
RCLQRT-20V711-3182.PDF 211.311KB
Latest Recalls Documents

- 𝗨𝗻𝗶𝘃𝗲𝗿𝘀𝗮𝗹 𝟭𝟮𝗩 𝗖𝗼𝗺𝗽𝗮𝘁𝗶𝗯𝗶𝗹𝗶𝘁𝘆: Works with any type of vehicle alternator or charging system.
- 𝗪𝗮𝘁𝗲𝗿-𝗥𝗲𝘀𝗶𝘀𝘁𝗮𝗻𝘁 𝗖𝗼𝗻𝘀𝘁𝗿𝘂𝗰𝘁𝗶𝗼𝗻: Designed with phenolic plastic to protect against moisture damage in marine, powersports, or off-road applications.
- 𝗠𝗮𝘅𝗶𝗺𝘂𝗺 𝗖𝘂𝗿𝗿𝗲𝗻𝘁 𝗧𝗿𝗮𝗻𝘀𝗳𝗲𝗿: Access power on demand up to 200A continuous current and up to 500A surges.
- 𝗜𝗱𝗲𝗮𝗹 𝗳𝗼𝗿 𝗦𝗲𝗰𝗼𝗻𝗱𝗮𝗿𝘆 𝗕𝗮𝘁𝘁𝗲𝗿𝘆 𝗜𝘀𝗼𝗹𝗮𝘁𝗶𝗼𝗻: Prevents primary battery discharge, providing a reliable and efficient way to power your car stereo system or other electrical accessories.
- 𝗘𝘅𝘁𝗲𝗻𝗱𝘀 𝗕𝗮𝘁𝘁𝗲𝗿𝘆 𝗟𝗶𝗳𝗲: Features a 100,000 mechanical cycle life.

- Function: An isolator is used to combine two batteries when a alternator is charging ( engine running) and isolate them when not charging ( engine off) so you can still start your vehicle
- Voltage: 12VDC/ Dimensions: 2-3/8"W x 2-3/8"D x 3-3/4"H/Power Handling: Continuous power handling of 200 amps/ Surge Power Handling: 300 amps
- Advantage: Does not create a voltage drop to the second battery like conventional isolators,reducing the natural consumption of batteries after power off, lengthens the life of the primary battery.
- Wrie Diagram : Connect the two small studs one to ground the other to an ignition on source from fuse box , the order on the large/ small studs does not matter
- Handle high power demand, Provide better service, please contact us if you have any questions!

- 500 Amp Battery Isolator
- 500 Amps at 12V Continuous
- 700 Amps Surge
- Switching Power: 10 - 16 VDC

- 【500 AMP BATTERY ISOLATOR】The 500 Amp Battery Isolator is designed to isolate a second battery or applications where multiple batteries need to be isolated, making it ideal for audio, navigation, winches, generators, etc., without dropping the voltage of the second battery as traditional isolators do while preventing the main battery from discharging
- 【PREMIUM QUALITY】500 Amp Battery Isolator Audio Relay uses high quality copper coiled wire to dramatically increase electrical and thermal resistance while extending service life, meets or exceeds OEM standards, and is endurance-tested for extreme environments
- 【HIGH CURRENT ISOLATOR】The rated voltage of this battery isolator is 12V, it can provide 500A constant current stably under 12V voltage, and 700A under surge power, which is upgraded on the traditional isolator, and it will not cause voltage drop to other batteries except the main battery
- 【KEY FEATURES】Prevent the main battery from discharging, when the main and secondary batteries are connected in series, it is easy to affect each other when charging and discharging, when your engine starts the battery isolator can connect the two batteries together and isolate them when the engine is turned off, which reduces the second battery's natural loss to the main battery and prolongs the service life of the main battery
- 【FULLY ADAPTABLE】This product has been carefully designed and rigorously tested, so please feel free to buy and enjoy the convenience and comfort that our products bring to you
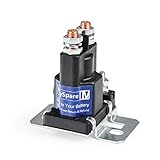
- Double Batteries Isolator Control On/Off Switch; Continuous Amps: 80,Surge Max Amps:150A ,Voltage: 12VDC; 100,000 mechanical cycle life./Normally Open With Attaching Hardware, Copper Contact With Sliver Pins
- Max Switching Currecnt could pass 150A at 5ms ,and Max Switching power could be 2000W / Replace: White Rodgers: 120-105751, 120-105751-6, 120-901S1,120-107112/ Cummins 3916301 3916302
- Note: It requires constant voltage as but depending on the application. The working time could be around continuous four or five hours , stop it and then use it.
- Install:The kit has included 4pcs big 100AMP terminals connected to loading and 4pcs small terminals which connected to original power. 4pcs insulated skin red cap.
- high current relays are the most reliable and efficient way to add secondary batteries to your system; Provide better service, please contact us if you have any questions!
This product presentation was made with AAWP plugin.